1.Vox V5151 Bluetooth Home Theater (5.1, Multi Connectivity) (Black)
Brand Name
IKALL
Colour Name
Black
Special Features
Subwoofer, Remote Control, Radio, SD Card
Speaker Type
Speaker Systems
Package Dimensions
35.5 x 29 x 25.4 cm; 4.9 Kilograms
Batteries
1 Lithium Ion batteries required. (included)
Item model number
V5151
Manufacturer
Arigato
Country of Origin
India
Item Weight
4 kg 900 g
2.Tronica
BT-777 Wireless Bluetooth Home Theater Speaker Supports SD Card, USB,
AUX, FM & Remote Control. (70 Watt, 5.1 Channel)
Brand Name
TRONICA
Speaker Type
Subwoofer, Bookshelf, Woofer, Satellite
Peak Power Handling - Speakers
70 Watts
Package Dimensions
38 x 30 x 28 cm; 5.7 Kilograms
Item model number
70 Watt (5.1)
Manufacturer
embee enterprises
Country of Origin
India
Item Weight
5 kg 700 g
3.TRONICA FD-201 35W 5.1 Channel Bluetooth Home Theater System with Remote FM USB AUX LED TV Support
FD-201
Tronica 5.1 Home Theater is an astoundingly power driven subwoofer that
has incredible sound of music and this gives an enormous output to
cover even big rooms with deep, powerful bass to deliver a perfect home
theatre with audio accuracy. Undoubtedly the experience of this will
take the listeners to the different music world. FD-201 5.1 Multimedia
Speaker comes with multi-input mode - BT 5.0 | USB | SD | AUX | FM, so
you decide how you want to listen to your music. It is technically
designed with down firing 4 inches woofer in solid wooden cabinet to
give ultimate bass in a compact size.. Unlike other brands, which use
speakers, this unique product has 3inches woofer's in satellite cabinet,
which combine with the centre woofer to deliver the best sound in a
small machine.
4.Philips Audio SPA5128B 5.1 CH 40W Bluetooth Multimedia Speakers (Black)
5.MUSIC
WINDOWS 90 Watts Home Theater 5.1 Channel Multimedia Speakers Systems
with Bluetooth, Remote FM USB AUX LED TV Support - Red Ring
Brand Name
MUSIC WINDOWS
Output Wattage
90 Watts
Colour Name
Red/Black
Special Features
Subwoofer, Radio
Speaker Type
Subwoofer, Remote Control, Radio, SD Card
Package Dimensions
34 x 32 x 25 cm; 4.8 Kilograms
Item model number
MW-5.1CH-Red
Manufacturer
MUSIC WINDOWS
Country of Origin
India
Item Weight
4 kg 800 g
6.WOODVOX Home Theater WINTY Big 5.1 Bluetooth Multimedia Home
System Speaker with 1 Subwoofer 5.25 Inch 5 Speaker Connect with Remote
USB Sd Card Aux Cable
The channels in 5.1 are left right center low frequency effects left surround right surround
7.1 has two additional channels more than 5.1 channels
The channels in 7.1 are
left right center lower frequency effects left surround right surround left rear surround Right rear surround
Surround placements of speaker should be in particular angle from the listener in 5.1
the left channel is placed at -30 degree center channel is placed at 0 degree. right channel is placed at 30 degree. left surround channel is placed at minus 110 degree. right sound channel is placed at 110 degree.
In 7.1
left surround channel is placed at minus 90 degree
right surround channel is placed at 90 degree
left surround rear will be placed at minus 150 degree
and right surround rear is placed at 150 degree
While exporting in Davinci resolve many had doubts about the differences between 5.1 film and 5.1. Not only in 5.1 case confusion also arises in 7.1 vs 7.1 film
In film 5.1 will be recorded in the order
L c r Ls rs and Lfe for 5.1
L c r Ls rs Lsr rsr lfe for 7.1
DTS 5.1 were given in compact disks in
l r ls rs c and lfe orders
DTS 7.1 has two orders that is
l c r ls rs lsr rsr lfe
l r c lfe ls rs lsr and rsr
Dolby and SMPTE adapted the order
l r c lfe ls rs for 5.1
l r c lfe ls rs lsr rss for 7.1
Currently, we are using the SMPTE order.
For 7.1 there is another song format called SDDS which is totally different from general.
7.1 that is l lc c rc r ls rs lfe
lc is left center rc is right center
You can see even the angles of speaker positions are different from regular dolby,dts,sdds .
All three can be encoded in one film print. If there is any issues in systems of dolby dds or sdds then the sound will get played from analog in film.
like this page for more updates .Kindly search dcstechie yash to see this blog on google search.
The continuity errors and how it was made unnoticeable.
Each
and every filmmaker works hard to deliver good movie .Their insecure
feel increases if they see their continuity errors in the edit if you
are director and you made a mistake don't panic,there are some survival
tricks and this article will help you to learn .
Beginner or
experienced that doesn't matter mistakes can be done by any director i
give you examples from your highly loved movies.
First one is
"Transformers-Dark of the moon". Most of the people seen the highway
chase scene plenty of times but i am sure that most people never aware
of any continuity errors.
In this scene first they the missed spatial continuity which is the establishment of the geography.
For maintaining spatial quantity for place and character position 180 degree rule is used
A
circle has 360 degrees after recording a shot cinematographer can shoot
from anywhere inside the semicircle where he shot the first shot and he
should not position the camera in other semicircle to capture because
doing that will collapse establishment and distract the
audience.If a person runs from left to right then that action should follow in other shots.
If
the 180 degree rule is not followed then the person will appear running
from right to left which will make the audience to think that the
person is going back to the place where he started in the scene.In this
scene they had totally crossed the line of action .Even that is not the
big issue over here.The issue is they changed the whole set just notice
the direction of the board.It was upside down position in before shot .
Now
it is straight.After the parallel jump of the cars you can see board is
facing us it is supposed to face the other direction .
There is
also logic error that the direction of the travel is changed.From the
picture you can see the actual direction of cars,how the consecutive
shots need to be shown and how it is shown .The problem here
is not only the 180 degree rule there is also logic error in the
direction of the cars which were jumped from the sign board .These two
cars needed to follow the first car but they were moving illogically in
other direction but when you are watching the movie in theater you may
not notice it .
Another example from one of the most loved movie "The dark knight".Notice the clean floor .
In later shots you can see the junk on the floor.
Notice the dead person under the van.
Now he is not there.Audience can extremely engage with the movie if the mood,emotional impact on audience and presentation of story is mastered perfectly.
They
will miss the continuity errors if they engaged more.In addition to the
mood set and story the eye for noticing will become blind totally if
the temporal continuity is wisely handled.
Temporal continuity of the dominant subject in the frame creates illusion of continuation .Other than edit even the best performance and attractive visuals will engage audience to the core ..
So don't feel insecure because of your accidental mistakes.Other than overthinking your mistakes work
wisely to make your story presentation better. Continuity errors can be
made unnoticeable if we made audience to get engaged with
Emotional impact Story Presentation Attractive visuals,temporal Continuity performances of character.
If
the continuity errors are noticeable more then the only solution is
sending the shot to the vfx or you need to go for reshoot which will
cost you a lot of money .
like this page for more updates.
Kindly search Dcstechie yash to make this website appear on google search.
"IMAX"It stands for “Image Maximum"."IMAX" is perhaps, the most popular movie format all over the world.The movie watching experience is enhanced in imax and that is the reason behind higher ticket prices in IMAX.
IMAX gained popularity much later in the 2000s.IMAX screens are six times larger than regular theater screens.
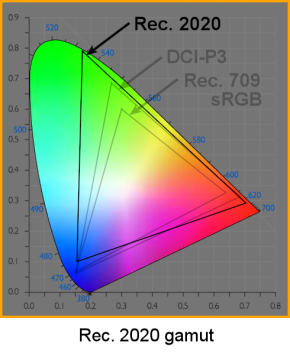
IMAX uses 40% larger screens and a 26% taller aspect ratio.In future dolby vision can compete IMAX.Laser projectors can do 4K digital projection to the huge screen in rec 2020 colour space.
IMAX has the 1.90:1 aspect ratio.Currently in 2022 we havemore than 1,500 IMAX theatres in more than 80 countries.
Imax has 12 channel surround sound speakers with 4 overhead speakers.
IMAX’s sound system is also good..
Shooting with IMAX are very expensive. Marvels "Avengers Infinity War" was the first movie shot entirely using IMAX cameras because it fits the storytelling they want to achieve in the film and production have enough money to spend.
Imax Digital 3D offers better quality with the image seemingly popping out of the picture.Just watch any disney movie like jungle book in IMAX to understand the full potential of IMAX experience.
IMAX Projectors IMAX uses a proprietary laser projection technology that delivers a rec2020 colour space which is a wider color gamut than what we usually see in standard or digital formats.Laser IMAX projector uses Rec.2020 colour space which has more colors than general theatre colour space.IMAX projectors are closer to the screen to make visual crisp, clear, and smoother.
IMAX completes the immersive cinematic experience by using a sophisticated speaker setup that isn’t possible in many theaters.Every IMAX theater has a different sound setup, custom-built to adapt to the varying factors that can affect sound quality.
The visual quality of IMAX 3D is much higher, bringing in an engaging experience.With its crystal clear images up to eight stories high, and wrap-around
digital surround sound IMAX gives you an outstanding experience.
IMAX theaters - We need to send DPX files to IMAX so that IMAX
could go through their process to make the IMAX Digital DCP.Keep in mind
general digital cinema colour space is dci-p3 but IMAX digital cinema
colour space is rec.2020.
A
Digital Cinema Package (DCP) is a collection of digital files used to project digital cinema.
1. Export your film as a 16-bit TIFF,dpx or j2k sequence. 2. Use free, open source DCP software to convert the TIFF sequence into JPEG 2000.(Now di technicians export j2k files directly from color grading software). 3. The DCP software then wraps the video (JPEG2000) and audio (WAV) in to MXF files.
IMAX laser projector can project 4k in 1.9 aspect ratio so the required resolution is 4096x2156(4096/1.9=2155.78).Kindly search dcstechie yash to see this blog on google search.
Before starting vfx works final edited version of movie should be
locked .If the movie sequence isn’t locked down before starting vfx
then we may lose many vfx shots. Destination timecode. & Source timecode is very important.
The
destination timecode is simply when, in time, the shot appears in the
movie.Movie will be sent in reels(two reeler) i.e divided parts of
the movie.The source timecode is simply where the shot appears in the
original footage.In offline conversion we need to get offline rush with
source timecode and clipname. The vfx artist needs reference of full
scene if vfx requires continuity.
For Rig removal(wires etc.) you need not to show in sequence. Vfx sequence should have previz if you are shooting some movie like gravity.
Generally
10bit DPX files is used in log profile for delivering VFX elements.Keep
the camera’s Log colour profile don't change it to linear.Half sized
quick time movies are great for online reviews.These can be supplied to
the client with water mark.Final delivery of vfx should be in log.
A good naming can help prevent confusion and mental tortures during deadline.
· i means input (input to VFX system) · YAS is the project name. · SNO is the vfx shot number. · BG the plate name. · v01 is the version. · 000029 the frame number · dpx is the file type . R1 is the reel no
i is for Input. Shots sent from the conformists to VFX department have names like this:
i_YAS_R1_15_BG_v01 i_YAS_R2_20_E1_v02 i_YAS_R3_30_E2_v01 o is for output. When the VFX team send a composite back to the editor they will name like this
o_YAS_R1_25_v03 o_YAS_R1_30_v07 e is for vfx element. This is the layer created by vfx team e_YAS_R1_15_beautypass_v01 e_YAS_R1_10_Smoke_v02 e_YAS_R1_02_PFX_v01
So
original footage coming into the vfx pipeling from editorial is an
input. Shots going out of vfx to editorial reference or finalized vfx
version is an output and we need to name everything else as element.
Input layers example i_YAS_R1_14_BG_v01 i_YAS_R2_05_E1_v02 i_YAS_R1_15_E2_v01 ‘BG’ is the background plate.Extra layers can simply be labled as ‘E1’, ‘E2’, ‘E3’ etc. Sometimes layers can be named as L1,L2,L3.....etc Footage in vfx are handled using image sequence files I_YAS_R1_14_BG_V01.000001.DPX I_YAS_R1_14_BG_V01.000002.DPX I_YAS_R1_14_BG_V01.000003.DPX I_YAS_R1_14_BG_V01…etc Sometimes the conformists prefer not to use the i,o, or e for relinking purpose.
The VFX editor co ordinates with editor and vfx departments.
Asst editors need to create temp VFX to avoid confusion.. The visual effects list is needed to make budgets.
Vfx file info sequence can be sent with an EDL,AAF,XML or an avid bin to conformists to distribute vfx shots.
Added visual effects should be converted to log or mattes needed to colour correct properly
Dont
pressurize vfx technicians which collapse their patience in work.Vfx
technicians output quality depends on patience of VFX technician
Be knowledgeable about deadlines. Give people warnings about deadlines but dont make it as torture.
You
must keep your composure. All information runs though you, and
therefore you have the power to prevent mistakes through good
co-ordination. Kindly search dcstechie yash to see this blog on google search.
Visual effects is used for the integration of live-action footage with artificially created realistic objects, characters and environments.Professionals currently use some soft wares to create almost magical imagery to add a sense of realism.Mostly in dangerous,impractical, or impossible to shoot situations we need to do vfx.
Softwares used for visual effects
Autodesk 3ds max
3ds Max is mainly used in the video game industry & Architectural modelling.It is used to create 3D character models, game assets,visual effects & animations.It is also used to create building models. Architects use the program to create 3D models of Interior and Exterior architecture to better understand the building or the object.
Maya
Maya is used by 3D animators across the globe and is built for feature film production.Maya is a better animation tool.
Maya vs 3ds max
3DS Max is better for modeling, texturing, meshing models and mobile games development Maya- Maya is better for Video games and animation.The initial release for Maya was Feb 1988,3DS Max the initial release was around 1996.
(Language availability)
Maya is available in English, Japanese, and Chinese languages 3DS Max in English,Brazilian,German, French,Portuguese,Japanese, Chinese, and Korean.
Maya is available for Windows, Linux, and Mac OSX operating system. 3DS Max is available for Windows operating systems(OS) only.
Zbrush
Other tool to create high resolution model is zbrush.ZBrush is a digital sculpting tool used for creating a high-resolution model.ZBrush used for sculpting, rendering and texturing alone while Maya used for animation, VFX modeling, rendering and lighting.Autodesk Maya is a complete package that provides modeling, simulation, rendering, and visual effect, motion graphics, and animation.
Mocha
Mocha Pro is best software for planar tracking, rotoscoping,removing object,stabilization, and mesh tracking, camera solving.VFX artists always prefer Mocha for its ease of use and outstanding tools for rotoscopy ,mesh tracking and camera tracker using track mattes.Mocha is available as a standalone application and as a plugin in your favorite softwares like avid,premiere etc.After analysing the shot mocha Pro can export the shot's tracking data, roto shapes, lens calibration and 3D data to post production softwares in a wide variety of formats.
PowerMesh tool in mocha enables a powerful sub-planar tracking process for visual effects and rotoscoping. Now Mocha Pro can track warped surfaces and organic objects and it is now highly used in digital makeup shots.
PowerMesh is simple to use and faster than most optical flow based techniques.Use PowerMesh to to drive roto shapes with less keyframes.You can export mesh vertices to Null layer in After Effects,Nuke tracking,Alembic format for Flame, C4D etc.
Roto with Less Keyframes
Mocha’s masking workflow reduced manual keyframes.Small no of keyframes are enough to rotoscope because mocha automatically track the rotoscoped subject.
X-Splines and Bezier splines are available to rotoscope in mocha with magnetic edge-snapping assistance which makes rotoscope easier.Using Area Brush tool we can brush a particular portion to mask.It helps to create detailed mask shapes .
To mask organic moving objects like musculature, skin, fabrics, and more PowerMesh in mocha is used
Stabilize Camera or Object Motion Mocha can stabilize even toughest highly shaking shots.We can eve export stabilized tracking data or render a stabilized clip.
Warp stabilisation tool inside after effects and premiere is used by many post technicians for simple stabilisations.With Power-Mesh tracking enabled, the Stabilize Module can produce an inverse-warped flattened surface for paint fixes.Original motion is easily propagated back to the original.Even other compositing tools has rotoscopy tools but still in vfx studio rotoscopy artists work with mocha.
Nuke
Nuke is the compositing application used by vfx giant companies like Digital Domain, Walt Disney Animation Studios, Blizzard Entertainment,DreamWorks Animation, Illumination Mac Guff,Sony Pictures Imageworks,Sony Pictures Animation, Framestore,Weta Digital,Double Negative and Industrial Light & Magic ,
Academy Award for Technical Achievement in 2001 was won by NUKE Nuke is right now one of the most popular "photoshop for moving images" or, "compositing" software.
Nodal toolset
It has more than 200 creative nodes and it delivers everything you need to tackle the diverse challenges of digital compositing,nuke has many creative tools which includes industry-standard keyers, rotoscope, vector paint tools, color correction and so much more.etc
3D Camera Tracker
The integrated Camera Tracker in NukeX® and Nuke Studio replicates the motion of camera of the shot. you can composite 2D/3D elements accurately with reference to the original camera used for the shot. It has more Refinement options, advanced 3D feature preview and lens distortion handling to improve efficiency and accuracy on the trickiest tracking tasks.With these tools we can maximize our 3D workflow
Nuke provides a wide range of keyers such as Primatte, Ultimatte ,IBK, as well as Foundry's Keylight®.
Nuke’s flexible and robust tool-set empowers teams to create pixel-perfect content every time.
Advanced compositing tools Nuke’s Deep compositing tools providing the best support to reduce the need to re-rendering CGI elements when we modify the content ..
Nuke supports phython scripting With very little programming knowledge you can make widgets and scripts using Python scripting in Nuke.
Tracking is easy
Nuke's 2D tracker and 3d camera tracker has a variety of options to make the tracking easier . It is possible to import tracking data from other softwares like mocha.
Nuke offers support for the leading industry standards including OpenEXR and rising technologies including Hydra and USD with support for OpenColorIO and ACES,color management is easy and ensures consistent color from capture through to delivery.
Nuke has made possible things we couldn't have imagined doing in compositing. There is not a single project where we don't need to use its 3D pipeline for ease.I cannot thank Foundry enough for making comping so exciting!
Kindly search dcstechie yash to see this blog on google search.Watch this video to learn more
In visual effects, match moving is a technique that allows the insertion of computer generated objects into shot with correct matching of movement and camera perspective.Sometimes it is referred to as motion tracking or camera solving.It seems very simple when it sounds but it is one of the technology which revolutionized the post.
Hulk, Captain Marvel, Spider man, Black Panther, Thor Ragnarok, and their legendary likes would not be possible without the art of match-moving.Today we can insert 3D elements into a 2D video clip after scanning the shot with match moving softwares.
The reason why match move artists track a scene is so that they can place objects, often CG elements that match the different perspectives of frame shots.
We need a virtual camera that moves exactly like the camera in the shot to place 3d objects.A good match move should be invisible to eye.No one should be able to identify that such visual effect was performed.While at it, it is worthwhile noting that matchmoving is different from motion capture.
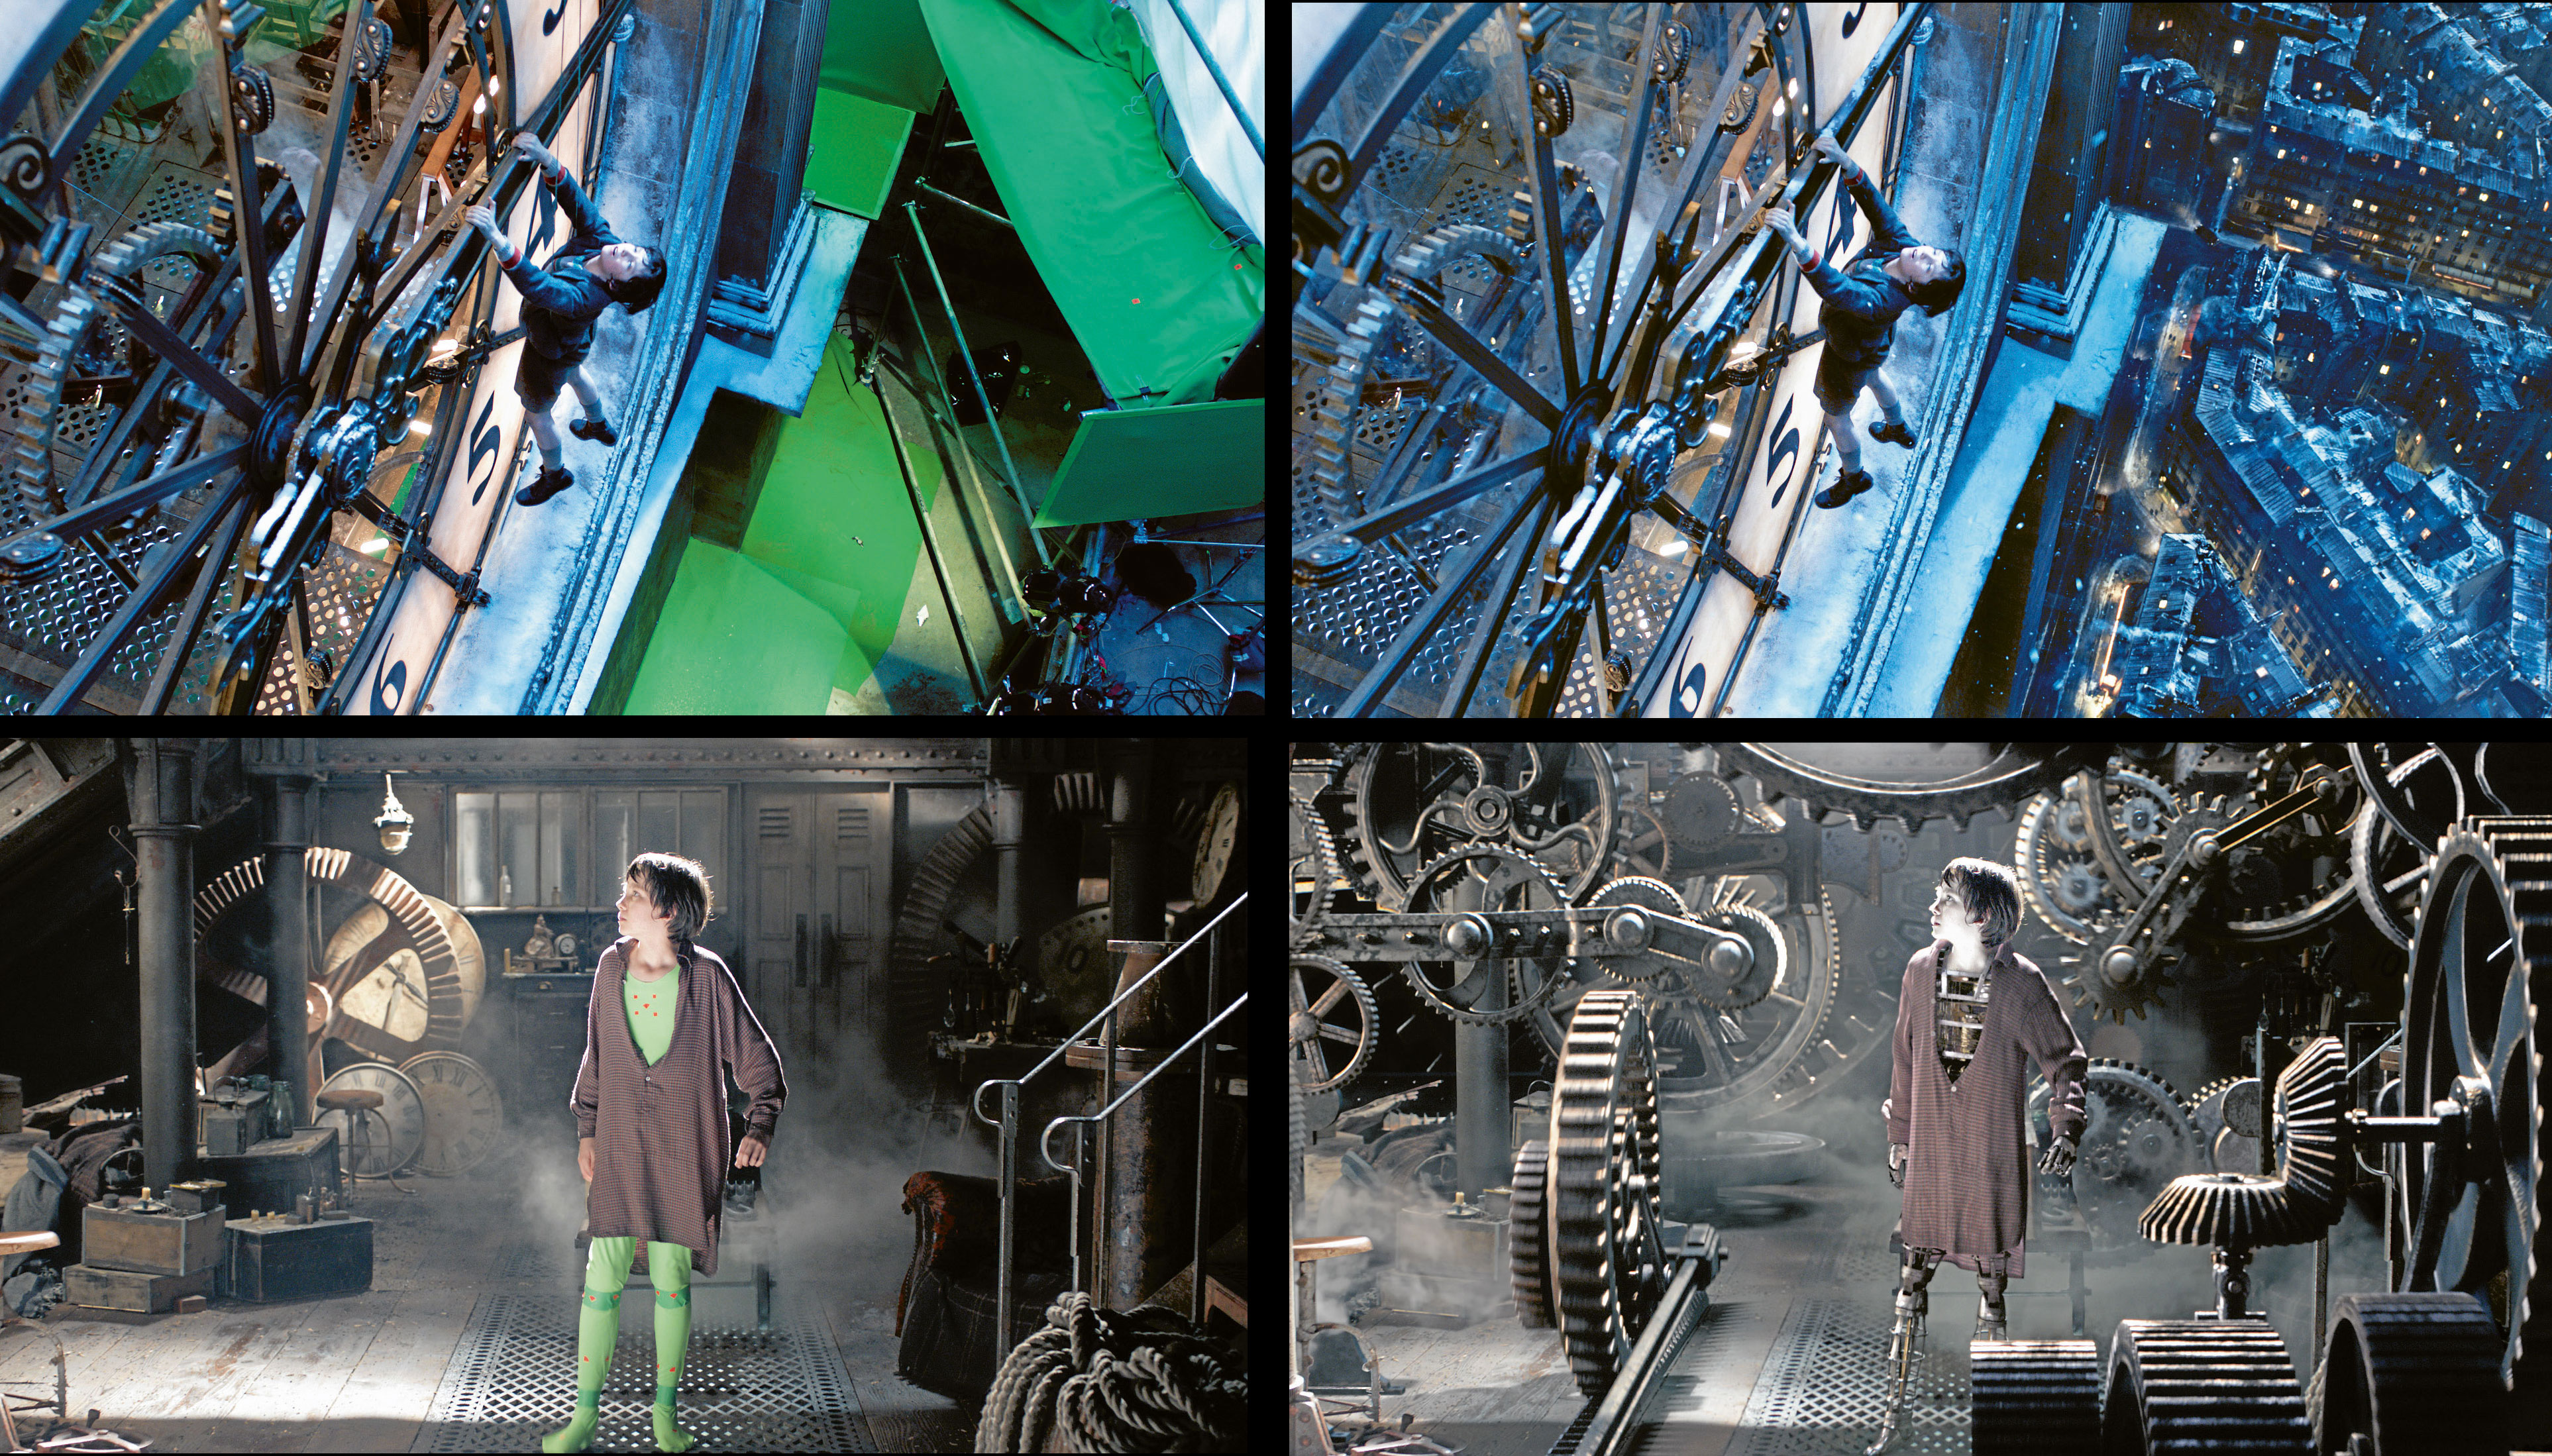
In Martin Scorsese’s “Hugo,” some mastered techniques were used that includes tracking, recording, and reproducing motion of live footage to a virtual camera.
Matching the computer-generated objects to shot is not as simple work.
Matchmoving is a name derived from matching of motion of live footage to match a virtual camera.
Automatic Tracking
Automatic tracking uses the algorithms in a 3dtracking software tools to identify and follow features throughout the footage. The software also scans focal length, motion, and lens distortion of a camera .Automatic tracking might struggle with shots captured by a shaking handheld camera or repetitive objects in the environment.
This automated method may find it difficult to detect the finest details in the motion blur and out of focus footage.
At that time we need to use tracking matte which is similar in concept to a garbage matte .
Two dimensional tracking only tracks features in two-dimensional space and we can use it if there is no major changes in camera perspective.
For example, changing the billboard.Three-dimensional match moving tools make it possible to to derive camera movement and transfer it to computer graphics softwares to animate virtual cameras.
Kindly search dcstechie yash to see this blog on google search.